Set up your backup bucket
BackupDrill writes backups to object storage you own — we never hold your data. Any S3-compatible bucket works; here are exact click-paths for the four providers the console supports, and how each value maps to the project form.
One rule before you pick: don’t store backups in Supabase Storage. Disaster recovery should survive a problem with your primary provider — keep the copy with someone else.
Cloudflare R2
Recommended — 10 GB free, no egress fees
Full walkthrough with pricing, lifecycle rules, and a scheduled workflow: back up Supabase to Cloudflare R2.
Six clicks, one screenshot each. Values that are yours alone (account id, keys) are blurred in the pictures.
- In the Cloudflare dashboard open Storage & databases → R2 Object Storage and click Create bucket.
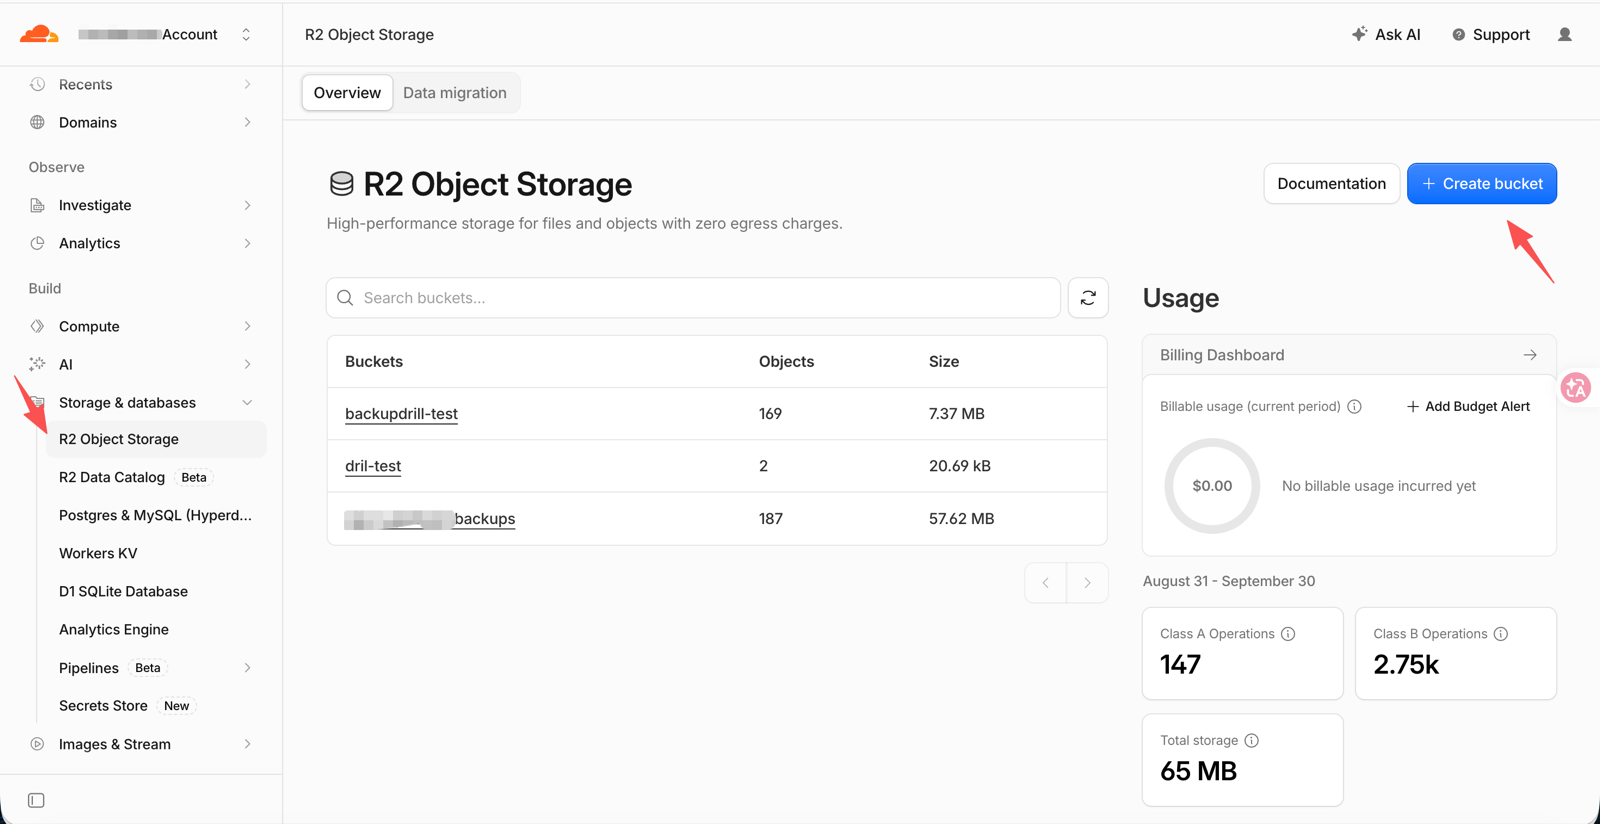
Left nav: R2 Object Storage under Storage & databases. Top right: Create bucket. - Name the bucket (any name, e.g.
my-backups). Leave Location on Automatic and Default Storage Class on Standard, then click Create bucket.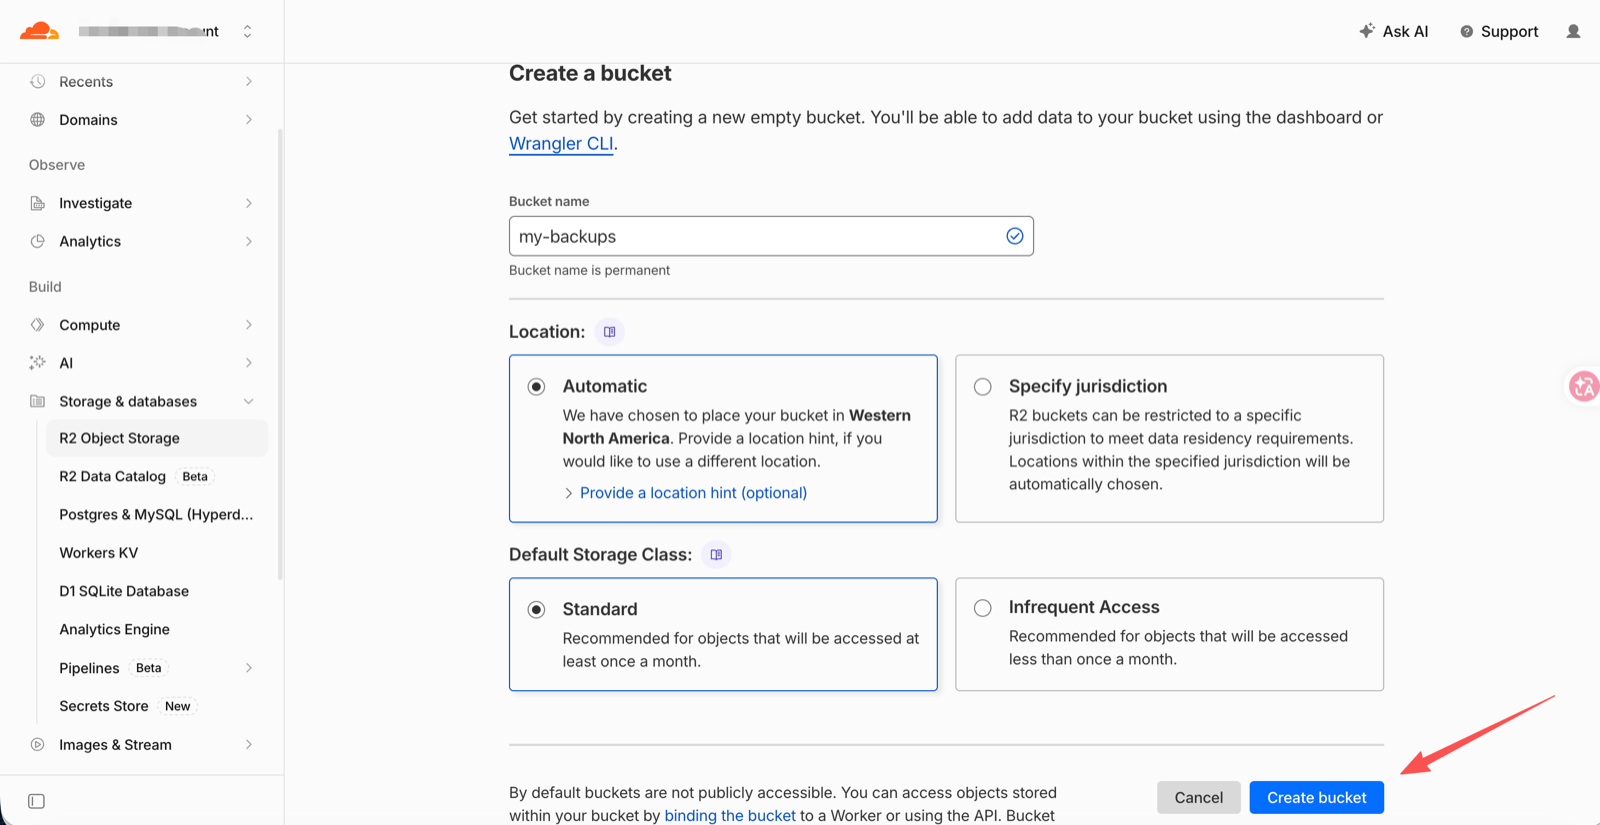
Bucket names are permanent; pick one you can recognise in a year. - Back on the R2 overview, scroll down to Account Details and click Manage API Tokens. This is the entrance people miss — it sits under the usage panel, not in the top bar.
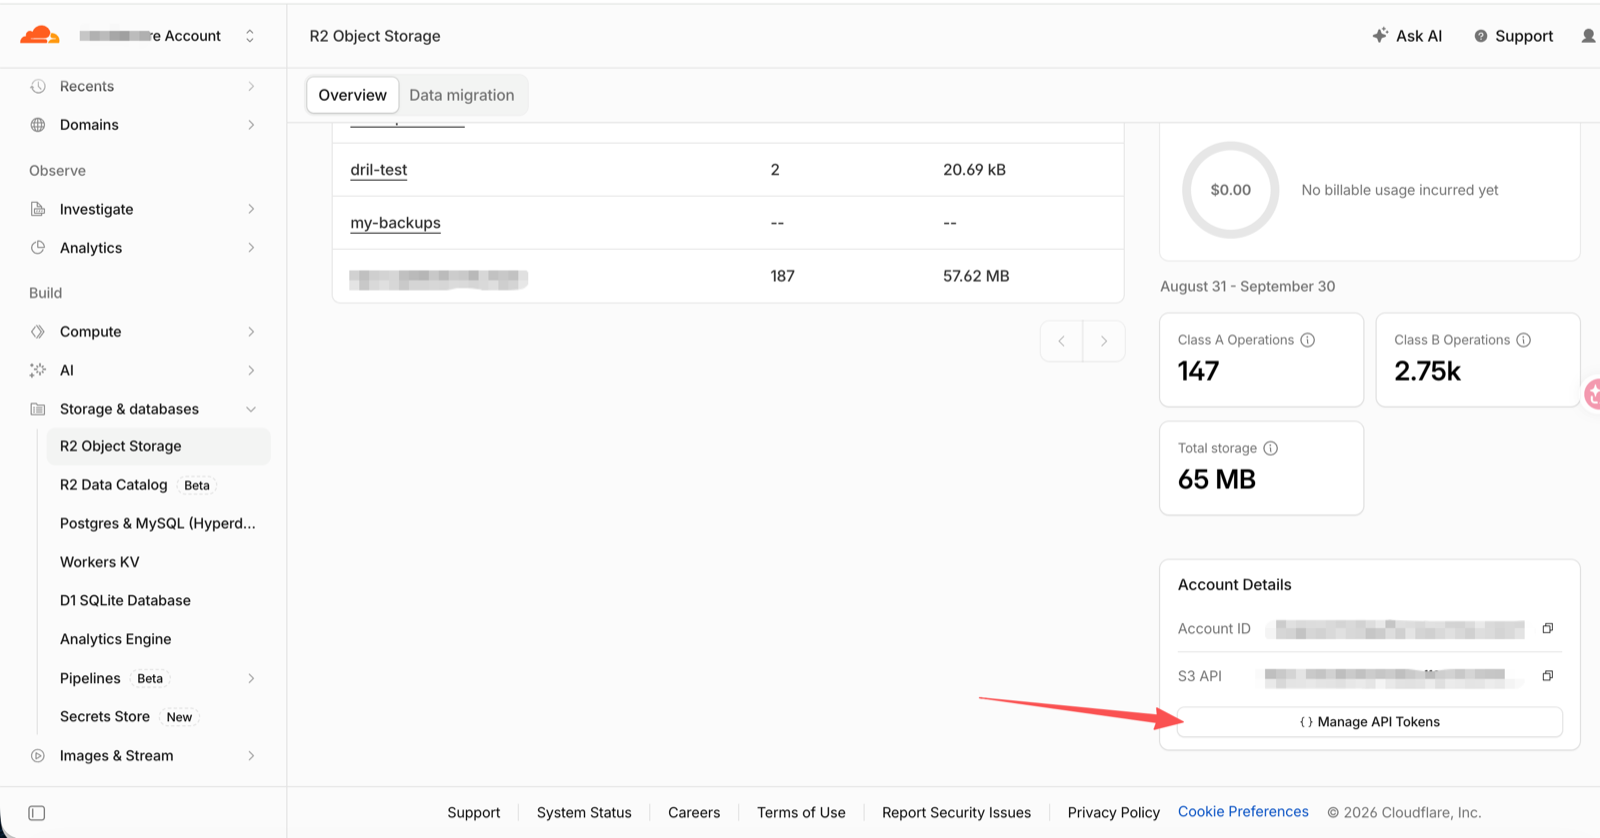
Manage API Tokens lives at the bottom of Account Details. Your account id and S3 API endpoint are shown right above it — you will need the endpoint later. - Under Account API Tokens click Create Account API token. Account tokens keep working if a team member leaves; user tokens don’t. Creating an account token needs the Super Administrator role on the Cloudflare account — if the button is missing for you, ask an admin, or use Create User API token further down: the remaining steps are identical, the token just stops working if you leave the account.
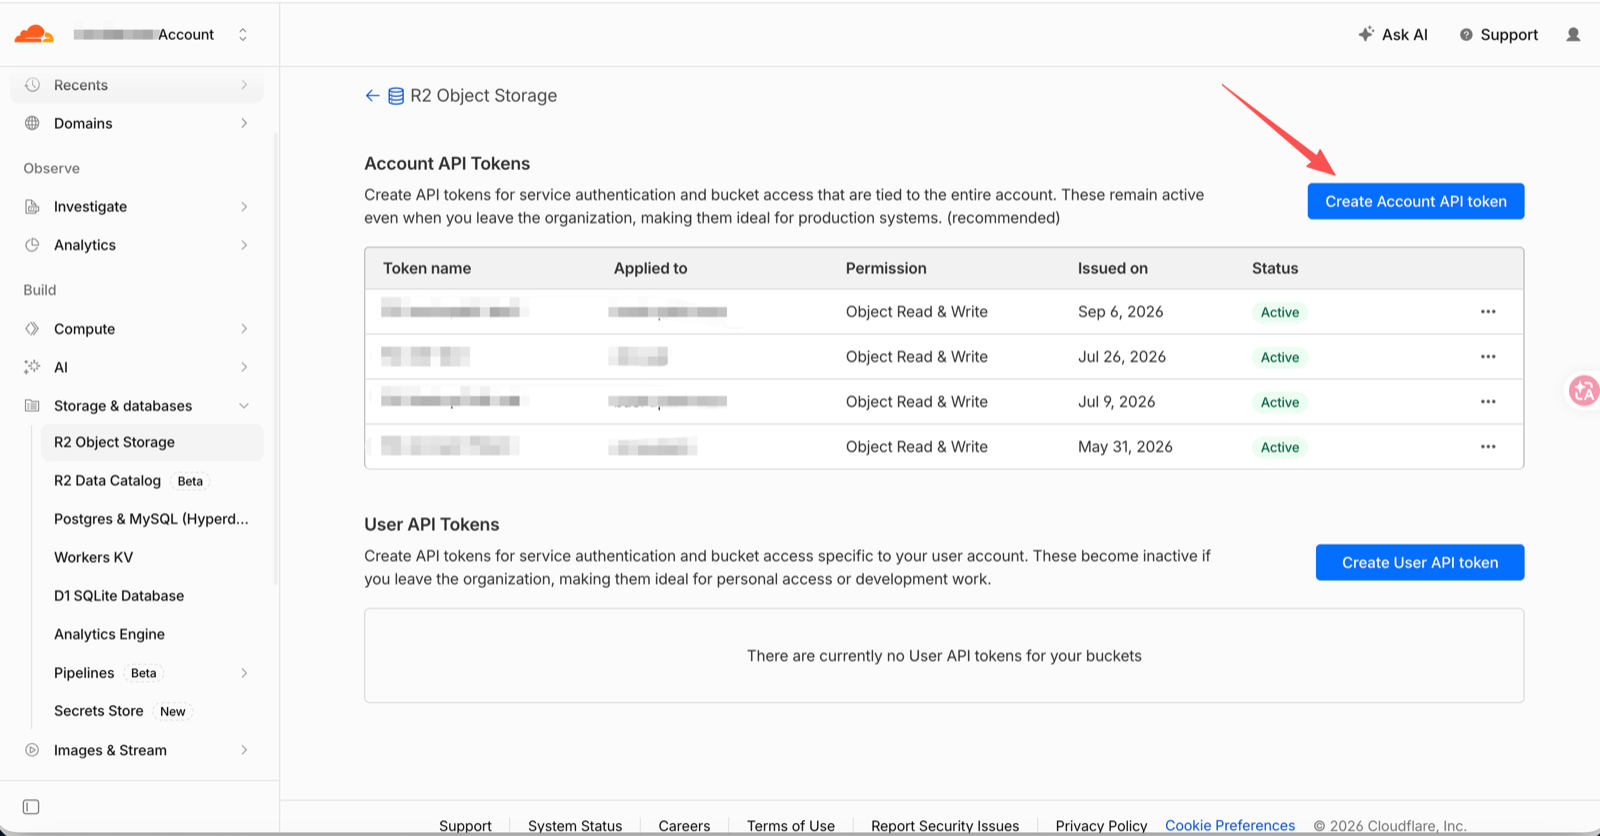
Account token when you can (it needs Super Administrator); otherwise the User token further down works the same way. - Name the token, choose Object Read & Write, choose Apply to specific buckets only and pick the bucket from step 2, keep TTL on Forever, then click Create Account API Token (or Create User API Token on the user-token path — the form is the same).
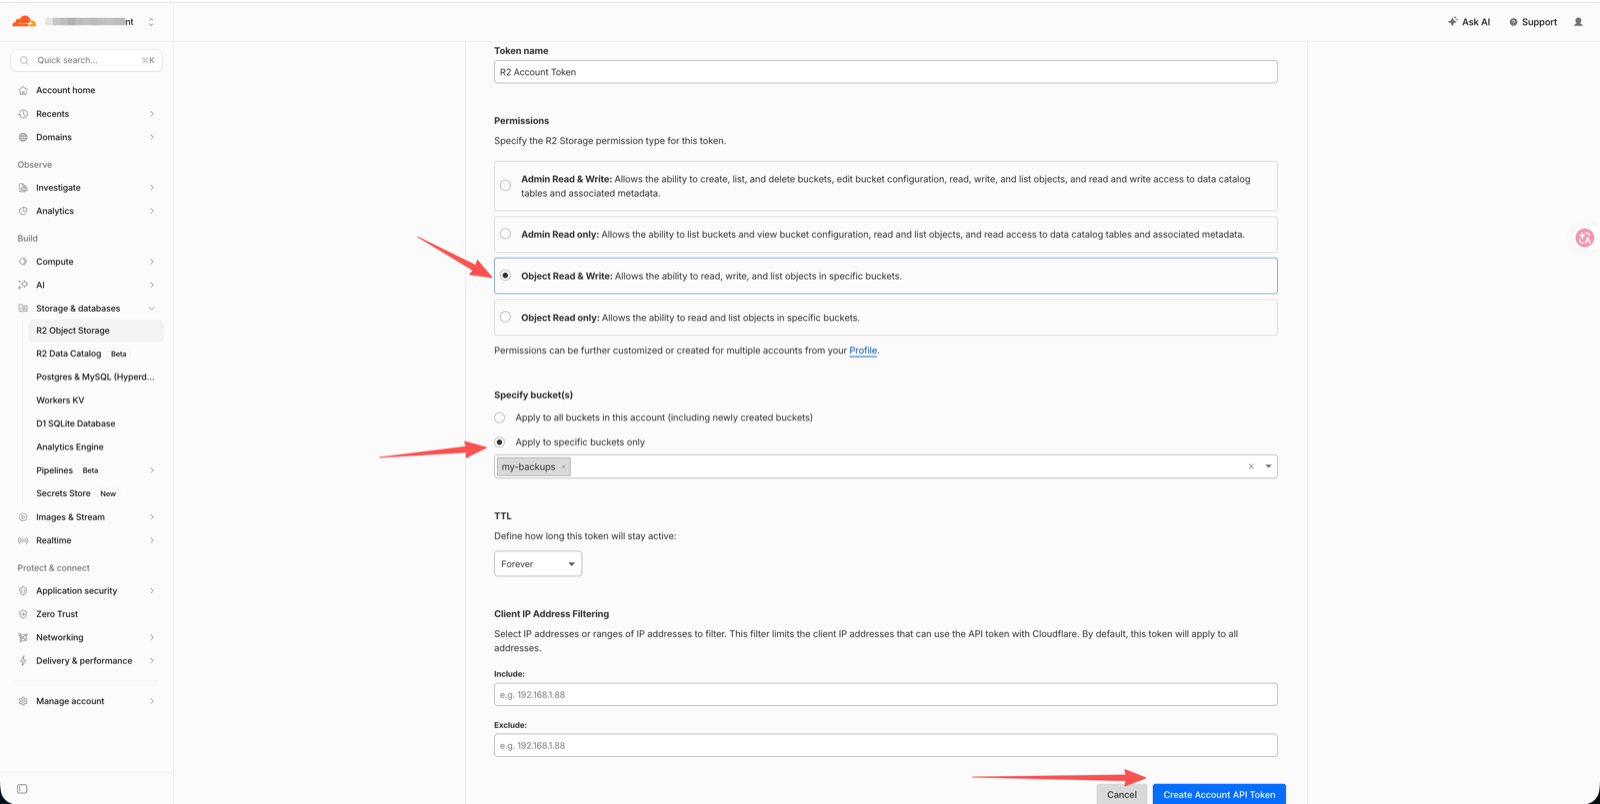
Object Read & Write is enough — BackupDrill writes snapshots and reads them back for restore drills. Admin permissions are not needed. - On the success page, scroll past the “Token value” at the top — that is Cloudflare’s own API token, not what you need. Copy the three values under Use the following credentials for S3 clients: Access Key ID, Secret Access Key, and the endpoint below them. They are shown only once.
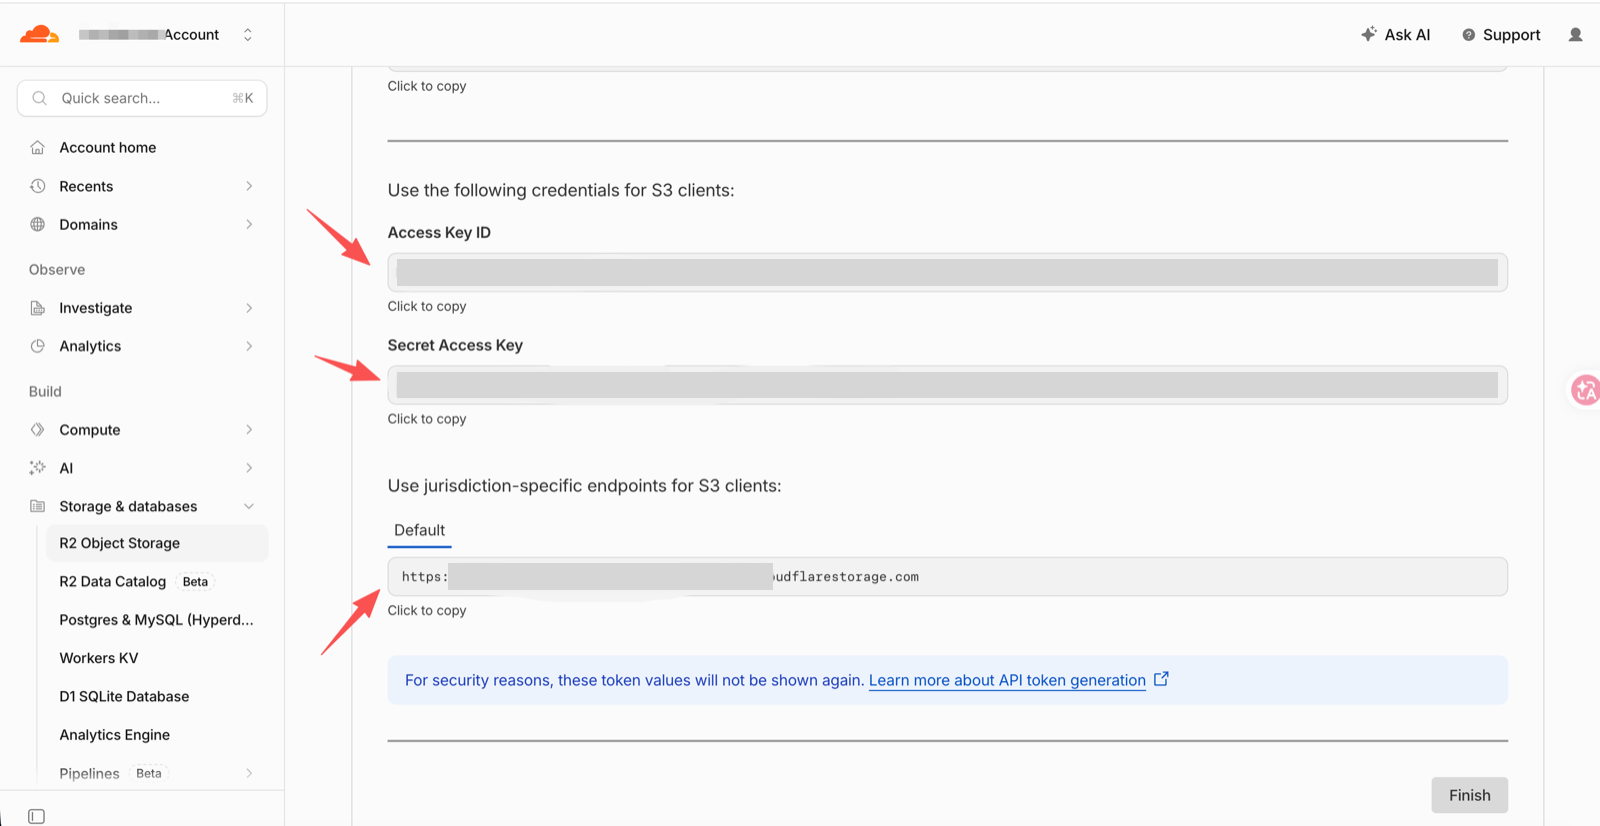
Three boxes, top to bottom: Access Key ID (①), Secret Access Key (②), and the endpoint starting with https://and ending in.r2.cloudflarestorage.com(③). Copy each one somewhere safe before you click Finish — the page will not show them again. - Open BackupDrill → Add project, finish step 1 (connect your Supabase project), and in step 2 click the Cloudflare R2 chip. Then fill the four fields exactly like this:
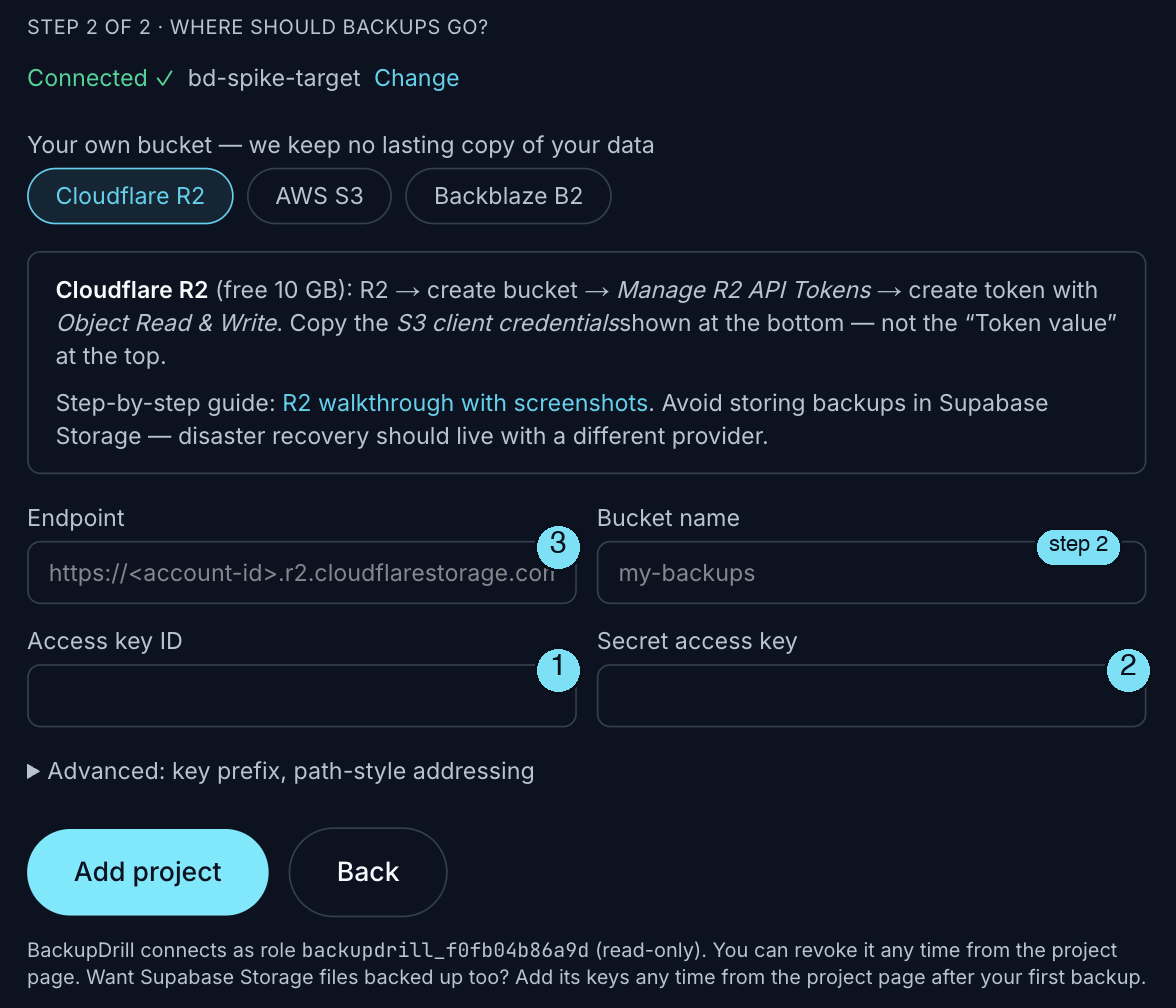
The badges match the boxes in step 6: ③ goes into Endpoint, ① into Access key ID, ② into Secret access key. Bucket name is the name you typed in step 2. Leave Advanced closed. BackupDrill field Paste Endpoint ③ from step 6 — the whole https://… address Bucket name the name you typed in step 2 (e.g. my-backups)Access key ID ① from step 6 Secret access key ② from step 6 There is no Region box for R2 — BackupDrill sets it to
autofor you, and path-style addressing is switched on automatically whenever an endpoint is given, so leave Advanced closed. Click Add project; the first backup starts within a few minutes and lands in the bucket from step 2.
AWS S3
If you already live on AWS
Full walkthrough with IAM policy, lifecycle ladder, and a scheduled workflow: back up Supabase to AWS S3.
- S3 console → Create bucket (Block Public Access ON — the default).
- IAM → Users → create a dedicated user (no console access) with a least-privilege inline policy on that bucket:
{
  "Version": "2012-10-17",
  "Statement": [
    { "Effect": "Allow",
      "Action": ["s3:PutObject", "s3:GetObject", "s3:AbortMultipartUpload"],
      "Resource": "arn:aws:s3:::my-backups/*" },
    { "Effect": "Allow",
      "Action": ["s3:ListBucket"],
      "Resource": "arn:aws:s3:::my-backups" }
  ]
}- That user → Security credentials → Create access key → copy Access Key ID + Secret Access Key.
Endpoint: (leave blank — AWS S3 is the default)
Region:   your bucket's region, e.g. us-east-1
Backblaze B2
Cheapest at scale
Full walkthrough with pricing, key mapping, and lifecycle rules: back up Supabase to Backblaze B2.
- B2 console → Buckets → Create a Bucket (files private).
- Application Keys → Add a New Application Key, scoped to that bucket with read and write.
- Map the values:
keyID→ Access Key ID,applicationKey→ Secret Access Key. The endpoint is shown on the bucket page.
Endpoint: https://s3.<region>.backblazeb2.com
Region:   the <region> part, e.g. us-west-004
Wasabi
Flat price, no egress fees, 1 TB minimum
BackupDrill is a Wasabi Technology Alliance Partner, and the Wasabi integration is tested against a live Wasabi bucket.
Worth knowing before you choose it: Wasabi bills a minimum of 1 TB of storage per month on pay-as-you-go, so a small database costs the same as a terabyte. Deleted objects are also billed until they reach the minimum storage duration (90 days on most accounts). It suits teams that already use Wasabi or keep a lot of backups; for a single small project, R2’s free tier is cheaper.
- Wasabi console → Buckets → Create Bucket, and note the region you pick.
- Access Keys → Create Access Key. Save both values; the secret is shown once.
- Use the service URL for your bucket’s region as the endpoint, and that region as the region. They must match, or requests fail.
Endpoint: https://s3.<region>.wasabisys.com
Region:   the <region> part, e.g. eu-central-2
(us-east-1 also answers at https://s3.wasabisys.com)
Set any lifecycle expiry to at least the minimum storage duration; expiring backups sooner does not save money on Wasabi.
Field-by-field mapping
| Form field | R2 | AWS S3 | B2 | Wasabi |
|---|---|---|---|---|
| Endpoint | step 6 box ③ (https://<account-id>.r2.cloudflarestorage.com) | blank | https://s3.<region>.backblazeb2.com | https://s3.<region>.wasabisys.com |
| Region | auto (set for you, no box) | bucket region | from endpoint | bucket region |
| Access key ID | step 6 box ① | IAM access key | keyID | access key |
| Secret access key | step 6 box ② | IAM secret | applicationKey | secret key |
Done? Head back to the quickstart to finish connecting your project, or straight to the console.